What Is HTML? the Anatomy of an HTML5 Document

This is the second article in our series on the absolute fundamentals of web development. Our first article explained in detail what HTML is on a conceptual level. We looked at what a markup language is, what tags are and how HTML compares to other important pieces of the web development puzzle such as CSS.
Join us today as we move on and take a look at each basic piece of an HTML document. I’ll explain all that stuff at the top of an HTML file that confuses you and outline the basic structure that you’ll follow for creating your own HTML files.
DOCTYPE
The very first thing that you typically see in an HTML file is the DOCTYPE declaration. Before HTML5, this could be a very confusing bit of code that looked something like this:
- <!DOCTYPE HTML PUBLIC "-//W3C//DTD HTML 4.01 Transitional//EN" "http://www.w3.org/TR/html4/loose.dtd">
There’s a lot going on here and every bit of it speaks to either the web browser, the reader or both. The “PUBLIC” part just speaks to the availability, the DTD stands for Document Type Definition, which declares the version of HTML being used and the final section is a URL pointing to where the DTD can be found.
The words “loose,” (or transitional) “strict” and “frameset” refer to different versions of HTML 4, which allowed for slightly different markup. These were essentially just to help transition developers from older versions of HTML.
The HTML5 DOCTYPE
There are several DOCTYPEs to choose from, which can be monumentally confusing for new developers. Fortunately, HTML5 completely simplifies the situation with a refreshingly simple DOCTYPE:
- <!DOCTYPE HTML>
What Does the DOCTYPE Do?
Now we’ve seen what a DOCTYPE looks like but we haven’t really discussed what it does. The answer is that the DOCTYPE tells the browser which type of HTML to expect, which in turn affects how the browser renders the page.
As you explore web development more, you’ll learn that there’s a huge emphasis on “standards-based development.” The general idea is that if we all follow certain rules and standards, web development will be a more cohesive and consistent practice. This is better for developers, better for browsers and most importantly, better for users.
DOCTYPEs were originally designed to trigger “standards mode” in browsers, which meant that the page was rendered using newer web standards. Similarly, older pages without a DOCTYPE triggered “quirks mode” in browsers, which allowed for older practices to be used that wouldn’t function properly in standards mode.
The new, very simple HTML5 DOCTYPE is supported in all major browsers, and it triggers standards mode in all of them. The DOCTYPE also helps you validate your code, which ensures that current standards are being adhered to. Every page that you create should use a DOCTYPE and hopefully be fully standards compliant.
Root Element
After the DOCTYPE, the HTML really begins. This is indicated by the HTML Root Element. If your entire HTML is a tree, this is the root from which everything else sprouts.
The Root Element is defined by a “tag,” which we learned about in our last article. In this case, it’s the “HTML” tag.
- <!DOCTYPE HTML>
- <html lang="en" xml:lang="en">
- <!-- Everything Goes Here -->
- </html>
Notice that the root element includes a language attribute, in our case English. Always be sure to indicate the appropriate language for every page you create.
Everything else that we will add to this page is situated inside of the Root Element. It is the container for every scrap of information and piece of content, the only exclusion being the DOCTYPE.
This is yet another thing that has gotten easier with HTML5. Check out the version of this snippet required for HTML 4.01:
Some other typical metatags include description and author. Here’s a quick, self-explanatory example of each of these:
Description
Author
This title is usually shown to the user at the very top center of the browser window, on a tab, etc.
Here I’m essentially loading my CSS file as well as jQuery (a JavaScript library) into the page. If these resources are included in the source files but not linked to in the head section, they will not function. Note that the links for these could either point to something in the local folder hierarchy (as above) or something hosted on another web server.
The link used above for the CSS file uses a link relation (rel=”stylesheet”). For more on link relations, check out this article.
Also, as an alternative to linking to external files, you can embed code right into the head element. Here’s an example with CSS, but the same can be done via the “script” tag and JavaScript (embedded scripts are often placed at the end of the body element instead).
All of these pieces were necessary to accurately paint the picture of what an HTML document actually is. We now see that an HTML document has a DOCTYPE that tells the browser how to render the page and helps ensure the proper standards are being used.
We also know that there’s a set hierarchy to how HTML pages are structured. Just about everything but the DOCTYPE is thrown into the root element, meaning it is the “parent element” of the head and body elements, which in turn have their own children.
When you’re just starting out in code, most people will simply give you a template for all of the code above without really explaining what it all does. This can leave a sizable hole in your education so it’s important to read through this information and attempt to understand what you can.
Everything else that we will add to this page is situated inside of the Root Element. It is the container for every scrap of information and piece of content, the only exclusion being the DOCTYPE.
Head Element
The next thing you’ll encounter in an HTML document is the “head” section. The head tag is exactly what you’d expect it to be:- <head>
- <!-- Some Code Goes Here -->
- </head>
The stuff that goes into the head section is primarily informational, it tells both you and the browser certain things about the page such as the title, the charset, etc. This is also where you traditionally load in important external resources.
There are a few important things that go into a head tag. Let’s look at them one by one.
Meta Tags
As you can probably guess, meta tags hold metadata about the page. Metadata takes many forms and can include keywords, authors, descriptions, etc. Here are a few notable inclusions:
Charset
This is pretty boring stuff, the charset is typically set to UTF-8 and essentially tells the browser which character encoding to use.
Your pages should definitely include an indication of which charset to use. Don’t over think it, it’s just one of those things you need to stick in your template. Below is a typical charset declaration in HTML5.
- <meta charset="utf-8">
- <meta http-equiv="content-type" content="text/html; charset=UTF-8">
Some other typical metatags include description and author. Here’s a quick, self-explanatory example of each of these:
Description
- <meta name="description" content="Some description about your page">
Author
- <meta name="author" content="Josh Johnson">
Title
Another thing that goes inside the head portion of your document is the title tag. This is a very simple piece of code that simply states whatever you’d like the title of the page to be. Here’s an example:- <title>Design Gallery, Deals, Tutorials & Community | Design Shack</title>
This title is usually shown to the user at the very top center of the browser window, on a tab, etc.
Links and Script
The last thing we’ll discuss regarding the head tag is the inclusion of external resources. In a very simple web page, you’ll typically see these take the form of a stylesheet or script:- <link rel="stylesheet" href="style.css">
- <script src="js/jquery.js"></script>
Here I’m essentially loading my CSS file as well as jQuery (a JavaScript library) into the page. If these resources are included in the source files but not linked to in the head section, they will not function. Note that the links for these could either point to something in the local folder hierarchy (as above) or something hosted on another web server.
The link used above for the CSS file uses a link relation (rel=”stylesheet”). For more on link relations, check out this article.
Also, as an alternative to linking to external files, you can embed code right into the head element. Here’s an example with CSS, but the same can be done via the “script” tag and JavaScript (embedded scripts are often placed at the end of the body element instead).
- <style type="text/css">
- a { text-decoration: none; }
- p { color: #333; }
- </style>
Body Element
The final portion of an HTML page is the most important. Everything inside of the body element defines the content and structure of your page. As far as development time, you’ll likely use a set template for everything above and spend a few minutes customizing it for specific projects. The rest of your HTML time will be spend inside the body element.- <body>
- <!-- Page Content Goes Here -->
- </body>
Putting it All Together
Now that we’ve walked through each individual piece of an HTML file, let’s put it all together into one extremely basic HTML5 template.- <!DOCTYPE HTML>
- <html lang="en" xml:lang="en">
- <head>
- <meta charset="utf-8">
- <title>Design Shack</title>
- <meta name="description" content="A Very Basic HTML5 Anatomy">
- <link rel="stylesheet" href="style.css">
- <script src="js/jquery.js"></script>
- </head>
- <body>
- <!-- Page Content Goes Here -->
- </body>
- </html>
An Overview
A thousand apologies for the mundane nature of this topic, beginners are often turned off by boredom at this point but hang in there, the real fun of HTML is everything between the body tags, which we haven’t even discussed!All of these pieces were necessary to accurately paint the picture of what an HTML document actually is. We now see that an HTML document has a DOCTYPE that tells the browser how to render the page and helps ensure the proper standards are being used.
We also know that there’s a set hierarchy to how HTML pages are structured. Just about everything but the DOCTYPE is thrown into the root element, meaning it is the “parent element” of the head and body elements, which in turn have their own children.
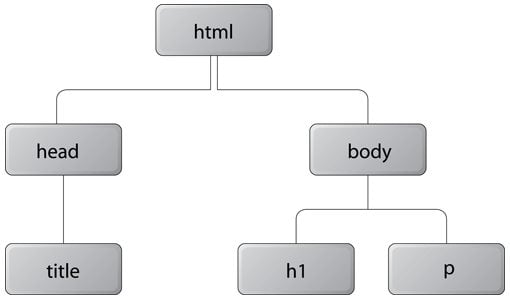
screenshot
The basic structure of an HTML document is referred to as the DOM, or the Document Object Model. This is almost always metaphorically referred to as a tree and depicted like image above. Our own Jack Rocheleau wrote an in-depth look into the DOM titled Deeper Study Into the WWW’s Document Object Model. For the next set in understanding the basic structure of an HTML page, check out that article.Conclusion
This article represents a very brief overview of how an HTML skeleton is structured and the types of things that are typically included. It is by no means exhaustive, but should serve as a good basic introduction to these topics.When you’re just starting out in code, most people will simply give you a template for all of the code above without really explaining what it all does. This can leave a sizable hole in your education so it’s important to read through this information and attempt to understand what you can.
SOURCE: https://designshack.net/articles/html/what-is-html-the-anatomy-of-an-html5-document/
_______________
Anatomy of HTML/xHTML tags
Tags and Attributes
As we covered in Introduction to HTML, HTML tags are defined by angle brackets <tag>.
Sometimes they are stand-alone, like the Image tag <img> or Line-break <br>.
All HTML tags can include one or more attributes.
These give the browser more information about the tag.
Let’s jump in and look at some of the most common attributes for everyday HTML tags.
- Style
- Name
- Href
- Title
- Class
- ID
HTML Style Property
You can apply the style attribute to any visible tag.
It assigns CSS styles inline.
(This is not always a good idea, see: Introduction to CSS.)
- <p style=”color:red; background:#ffc; padding:1em;”>Hello mum</p>
Looks like:
Hello mum
HTML Name Property
The name attribute is used by more than one type of tag.
Form elements
Form elements should have a name attribute in order for server-side scripts to work out what was entered into each field.
- <form action="yourscript.php" method="get">
- <input type="text" name="username" />
- <input type="password" name="password" />
- <input type="submit" />
- </form>
On-page anchors
The anchor (<a>) tag isn’t only for creating links.
You can also use them to create places on a page that you can jump to directly from a link.
e.g. You can create an on-page anchor with…
- <a name="mainbody"></a>
Which you can then link to with…
- <a href="#mainbody">Skip navigation</a>
HTML Href Property
href stands for “hypertext reference”, and simply means the target of a link.
e.g. A link to another site…
- <a href="http://www.scratchmedia.co.uk/about-us.html">About us</a>
A link to an anchor on this page…
- <a href="#product1">Product One</a>
Or a link to an anchor on a different page…
- <a href="people.html#geoff">About Geoff</a>
HTML Title Property
The title attribute is different to the <title></title> tag (which goes in the page head and sets the title of your page).
The title attribute provides a bit of extra information for a visible element, like a link, image or button.
In most browsers, it causes a tooltip to appear when the mouse pointer hovers over the element.
e.g.
- <input type=”button” title=”Don’t click this, it doesn’t do anything.” value=” Useless ” />
Looks like…
HTML Class Property
- <div class=”comment code”>
Almost any tag that you put in the HTML body can have one or more classnames.
The example div above has two classnames: “comment” and “code”.
At the highest level, a tag’s classes provide additional description about what kind of element the tag is.
For example, the example above is described as a “comment” container and also as “code” container.
These definitions don’t really mean much on their own, but it’s good practice to make sure they make sense (i.e. semantically useful).
(For example, my code snippets get the “code” classname, instead of being called class=”greybox” or class=”typewriterstyle”)
What you can do with Class
You mainly use an element’s classname(s) to assign styles through Cascading Style Sheets, but it’s also possible to read them and do stuff in DHTML.
Example of applying styles in CSS using elements’ class.
The classname is prefixed with a dot/period to specify that it applies to elements with class=”comment”.
- <style type="text/css">
- .comment {
- border:1px solid white;
- background-color:#f6f6ff;
- padding:1em;
- margin:.5em;
- border-left:6px solid #eee;
- }
- </style>
HTML ID Property
- <div id=”introblock”>
Anything can have an ID attribute.
An element’s ID is its unique identifier.
Note: There should only be one element on each page with a particular ID attribute.
What you can do with ID
Like class, id is frequently used to assign properties through CSS.
Here, note how the id is prefixed with a hash/pound sign, to show that it applies to elements with id=”nav”.
- #nav {
- height:76px;
- float:right;
- display:block;
- text-indent:-3000px;
- }
(CSS styles assigned to an element’s ID override any of the same style properties assigned through class.)
The ID attribute is particularly useful in DHTML.
It’s very often used to identify a particular element in JavaScript.
e.g. This code finds an element with the ID “nav”, and hides it.
- <script type="text/javascript">
- <!--
- if (document.getElementById('nav')) {
- document.getElementById('nav').style.display = 'none' ;
- }
- // -->
- </script>
SOURCE: https://webdesignfromscratch.com/html-css/html-tag-anatomy/
_______________
_______________

0 comments:
Post a Comment