Okay, so I'm back on my Mac. And I'm actually looking at GitHub.com. And I'm already logged in into GitHub. So the first thing we're going to do is we're going to go over how to create your own repository on GitHub, and then how to turn that repository into something you could store your code and your website code in and then have that same repository turn around and host your website for you. As part of this demonstration, I'm obviously going to use some git commands in order to commit, in order to save, and in order to upload our code that is local in our machine to GitHub.com. Now I highly encourage you to actually learn git pretty in depth. I'm not going to have a whole course here in just a lecture or so. On git. I will however give you enough of the command so you'll be able to be functional. But I would very highly encourage you to read at least through the branches chapter of the git book. And the way you can do that is it's free online. You just say git book. If you say git book, the very first thing you should come up is this git book link. And this is a book that if you wanted to actually get a PDF, or you could read the entire thing online, and I strongly suggest that you read the first three chapters. It's really not that complicated. But for our purposes, as long as you know the commands that I'm going to give you, you should be okay. But if you want to become a full stack developer, or even just a front end developer. You should definitely try to learn git and it's basic commands. Okay. So I am in my account right now. This is my and this is my account. And Probably you're going to see something very similar, but you probably aren't going to have as many things going on, possibly, in your GitHub account. So the first thing you want to do is create a GitHub repository. This is how you're going to basically submit your assignments as well. So you could go to your picture, your icon, whatever it is, and there's a little icon next to it to the left of it and it's a plus, and if you click on it, click on the down arrow, you could say new repository. And now go ahead and create a new repository, we'll call it coursera-test, and this is okay. I already tried that before, so it already knows that I've tried that. So coursera-test, and it'll give you a green check mark saying yes, it's available. And I'll just say this is a coursera, course coursera-test repository, and it's going to be public. If you want to make it private, you have to pay. We're not going to want to pay, so we're just going to leave it public, and we'll go ahead and initialize it with a README file, always a good idea. And all you have to do now is click create repository. Let's go ahead and do that, and voila I have my own repository ready to go. So once I have this repository I can start interacting with it not only online here, but also through my command line prompt and upload code to this repository. But before we do any of that let's prepare this repository to host our actual website to the outside world. In order to do that, we have to do a couple of special things. Number one is, we have to go to settings. We'll go ahead and go right here on the top right, we'll click on Settings. And if we scroll down, you'll see here GitHub pages, automatic page generator. Basically it says, create a beautiful website or a site for your project with our automatic GitHub page generator. Okay, so all you really have to do is click this button, launch automatic page generator. And it doesn't really matter what this says, you could certainly customize it later. You could scroll down all the way down and say continue to layouts and by default it's going to give you this pretty neat layout actually. And you don't have to even check it out. You can just click publish page.
So the layout is not really what we're after. So once we're done with that you'll see here that your project has been. Created at HTP and you'll see your user name, if you have a user name. And the URL is github.io/coursera-test. That's where your page is located. So if I go right now and copy this link right here. And we'll go to a new tab. You're really going to see the entire website that we just saw right here. Right? And that's all pre-filled for you already. Now this link will not always stay here, if you refresh the browser it's gone. If you forget where that link is, where do you find it? Well you go back to settings and you scroll down and under GitHub pages, you'll see that link again. You can actually click it, open it up and there it is again.
Now when you created the GitHub pages. Let's go back to our repository, we'll click on this, coursera-test. So now know when you created that link, what you actually did is you created a separate branch. Now I'm not going to go into again a whole big explanation about branches, but the bottom line is the way git works is it can have several branches, like several parallel streams almost of the same repository, of the same kind of database of your code. So, the way you see what branches you have is, by right here branch and right now it says it's master. If you click on it you'll see that there's another branch here that actually wasn't there before. If we opened it up before we would've seen only master. But now there's another one called gh pages. If you click on that gh pages, you'll see all this stuff here you really didn't put in here before. Well this stuff is that website that was created for you. So that index.html is that big page with the giant green banner that you've seen. So now, if you're an advanced GitHub user, feel free to use whatever branch you want and then go ahead and merge your stuff into the gh pages branch. Just know, what is in gh-pages branch, that is the only thing that is going to show up on that special link that you created. Nothing in the master, nothing in the other branches will actually show up. So for the beginners what I would suggest doing is, that you should always use just gh pages, and commit everything there. But just remember that the base directory is that website that got created. So if I were you, I would probably create a subfolder and put everything into that subfolder and leave this front page alone. Or if you want you could wipe the whole thing out and create your own page here right here in the root folder. But for now, it's time to go ahead and take this repository and bring it down to our local machine. Well the way we could do that is we have this right here, this URL. This URL actually points to our repository. You could see it has coursera-test.git, and we could copy this URL by just simply clicking this link. We go ahead and open the terminal. So now, what we'll do is we'll say git clone. Clone is the command to actually take the repository that is somewhere remotely, and just provide the URL to that repository and you can see we're done. If you do a less now you'll see that I have coursera-test that is our repository right there. Let's go ahead and cd into it and you'll see that the only thing there it's a README. Okay so really what's going on, if you do git status you'll see that we're on branch master and nothing really is, right now, changed. The thing is though, we won't really want to on branch master. Again, unless you are a more advanced user really want to be on the branch gh pages. And the way you could do that is to say git checkout gh-pages, and when we do that now we say git status, we're going to be on gh-pages. And if you do ls you'll see all that index.html.params@json, then stylesheets folder. It's all there from if you switch back to the browser it's all right here in that branch.
So now we have a couple of choices. If we want, we could just go ahead and wipe out this whole thing, and we'll basically wipe out that auto generated website. Or we could leave it alone, and just basically make a directory. Make a directory, and then we'll call it, let's say site. And CD into that site directory, and there's nothing there. Great. So now we could go ahead and open up Sublime Text and we'll save this page right here. We'll go ahead and save this page to coursera > coursera test > site. We'll save it and call it index.html. And we could quickly do html and do ctrl + space for a quick little template. We'll say hello. Coursera.
And we'll have h1 here. Also say, hello coursera.
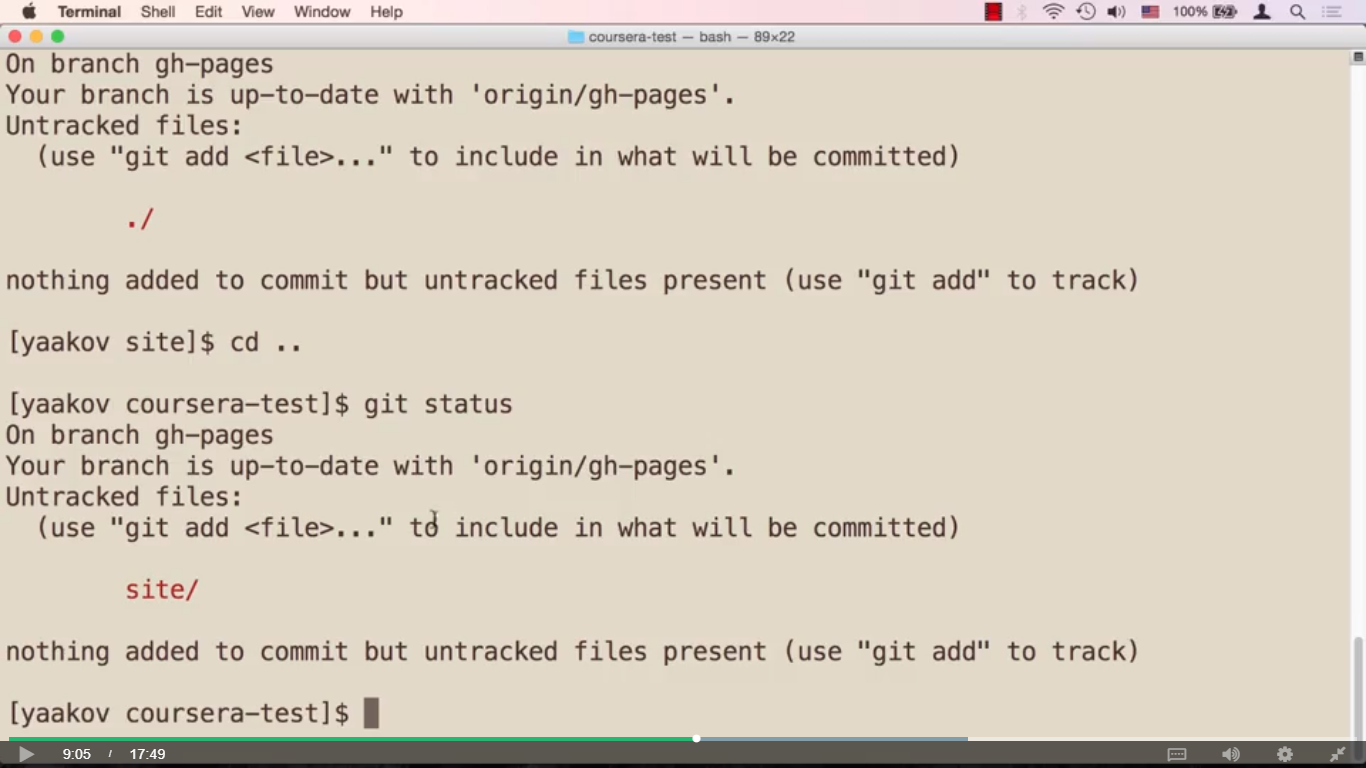
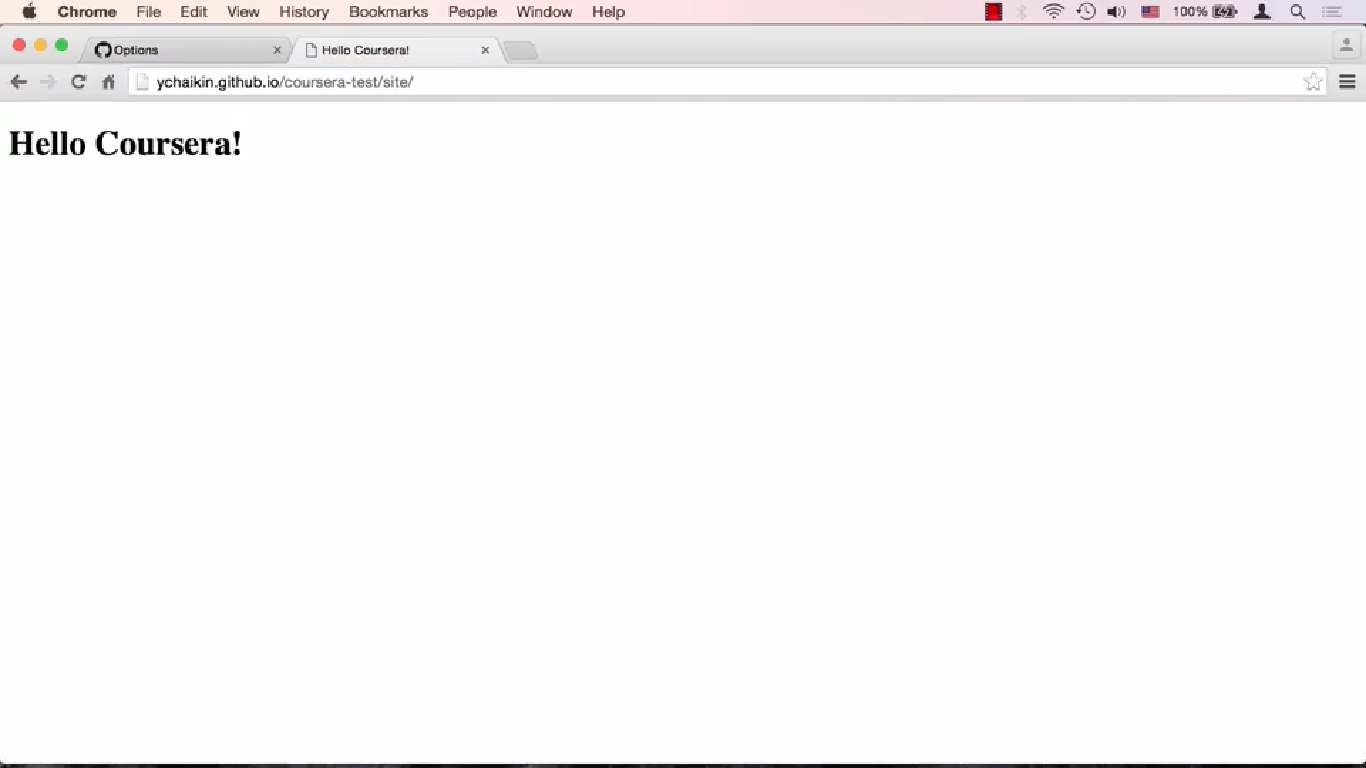
Okay, so we have a very quick page. We saved it. Let's go back to our terminal, window ols, and we see this in the HTML. So now to check what's going on in our local git, we'll say git status again. And we'll see that actually ./ and that's because we're inside the site directory. We say that ./ is not actually committed at all. Well we could go one directory up, and then we'll do git status and that will tell you that the site directory is not even. and committed and it's not even marked to be committed so the way it works in order to be committed into the kind that your code data base which actually resides locally in your machine. It is not the remote one. Not the git hub, but the local in your machine is you first have to mark something for committing. The way you mark something for committing. Is you say git add, and then you say what it is that you want to commit, or that is you want to mark for committing. And this one, I'll say dot, and we'll just include everything in my local folder, and that's done. Also, git status again. And you'll see now, what's marked to be committed is that new file, site/index.html. And once again, we haven't committed anything yet, we just marked to be committed. Well, in order to actually commit it, we'll say git commit, we'll say -m, which is required for message, and we'll give it a message. The message will say, My First Page, and we'll press enter, and we're done. And the only thing we need to do now is actually put this into our remote, meaning into our GitHub the remote depository. Right now, everything is sitting in the local depository. If we say git status again, you'll see that everything is great except it'll tell you that your branch, meaning this origin that gh-pages, don't worry about this origin thing, just ignore it for now. But gh-pages is ahead by one commit, meaning our local version of our repository with all of our code is actually ahead of the one that is remote, which is our GitHub repository. So the way we actually do it, it actually tells you right here. Is just issue a git push meaning we'll take our repository take our database of our code, and we'll push it to the remote database which is residing at GitHub.com. So we'll go ahead and say git push and at this point after we enter your machine might ask you for username and password for GitHub my machine has it already entered automatically and you could look up on the web how to do that so it doesn't ask you again. But we'll say Git push and it should give you something like this or tell you something about the fact that I wrote into this repository and you'll see gh-pages, our local gh-pages and our, a local machine has been transferred to the remote one, gh-pages. Okay, so now, if we switched our browser, and we'll refresh this page, you'll see that this site folder showed up here, if we click inside of it, you'll see index.html. Well, let's see if it actually works. We'll go to Settings again, because I don't remember this URL anymore. And we'll click on this URL, open up in a separate tab, and what we see here is that page made by GitHub for you. But remember that right underneath that folder is that folder called site, and if we say site slash here's our page, Hello Coursera. That's the page that we made. And the reason I don't actually have to specify index.html page itself is because most servers when you say slash they will default to index.html. So I don't have to explicitly say it. And clearly GitHub server is one of those servers. And the truth is most services out there actually do this. And if we create anymore sub folders here we could certainly specify them, and if you wanted to, for example, do assignments for different modules, and you could say module one assignment slash something and so on. And this is the way for you to be able to submit your assignments to us to be graded. And then you could continue making your changes. So we'll go ahead and open up sublime, we could make another change, hello Coursera! It's a great course.
We'll save it again. We'll go back to our command line. We'll say get status, and you'll see that now we have a modified page. Well, again, we haven't really marked it to be committed yet if we're done editing it. We could go ahead and say git add and we could say it explicitly if we want to. Or we could just say dot, it doesn't matter. And we edit it and say get status again. And you'll see now it is again marked to be committed to the repository, to our local repository. Well, we'll say again git commit -m for message, and we'll say, small addition to our page content. And we'll say enter. And now, we have committed a change that we have just made, committed that change into our local git repository, but our remote repository doesn't know anything about this. If we switch the browser and we refresh, it's still the same. Well, the reason it stays the same is because nothing really has been uploaded to GitHub yet. And if do git status, it will tell us again that our local branch, the gh-pages, is the head of the remote one by 1 commit because we committed something already. And we can have more than one commit here. We can have more than one commit, and then at some point we'll go ahead and upload it. Or publish our changes to our repository. So we'll say git push to publish our changes, and we're done. So if we switch to the browser and refresh, it might take a little bit, but eventually, this will happen. So something probably got cache. Here we go. It just takes a little bit for it to propagate from its repository to its website, so it took a few seconds, but it's here. Okay, so there's clearly many, many other commands that you could use. For example you could use gitpool if somebody else changed your repository, let's say you're collaborating with somebody. And somebody updated something in the remote repository in the GitHub, and you want to get those changes to your local machine you'll say git pull and so on. And again, I encourage you to go through the first couple of, two, three chapters of the book, and it's definitely very helpful for you to understand. What's really going on with git. However, the commands I gave you should be good enough to be able to publish your code to git hub. And at the same time publish it to git hub pages so they could be visible to the whole world and to the rest of your peers to be able to be graded. So, the next thing I would like to show you is how to use browser sync. Let's go ahead and clear our page, and we are still here inside the GitHub repository, or our local folder. We'll go ahead and go inside site, and here's our index.html. So, browser sync is a command you could call from the command line and here I am just pulled it out from my history. And basically you say browser-sync and you say start. And you want to start the browser sync and you want to start it in server mode so it'll become like a local HTP server for you. And you could say --directory, all that will do is it will actually give you a directory listing of the folder you're sitting in right now, which is, in this case, is the folder called site. And then you say --files, meaning which files should browser sync wish for. And if any of those files change the browser sync will go ahead and then reload those things in the browser so you don't have to keep clicking reload over and over and over again. So in this case we said star I want to reload everything no matter what changes I want those changes reloaded right away. So go ahead and start it. Once I start that, it will go ahead and open up a browser window for me, and in this case you see it is local host port 3000. Since we did -- directory, it's showing me the directory listing of that folder, which is right now the sight folder. And I can see that it's connected to browser sync. And here's this, It's a great course! So now what will be really neat is if I can now pull this aside for a second and open up my sublime text, and just show you what happens when you actually edit this. So now I can go ahead and say, you know what, let me remove this. And I'll remove it and the second I save it, take a look at what happens when I save the file. When I save the file, all of a sudden this gets updated as well. So this is extremely convenient, so that means no matter what is going on here the Cascading Style Sheets, a new content, whatever, it always become immediately available right there in the page. So you don't have to keep coming over here and clicking refresh. That is a huge time saver. When you're developing and trying to see, immediately, what's going on on the page without having to go and clicking refresh. So, that's browser sync, it actually has a million other options and I encourage you to go on their website Google for browser sync. And you'll see all the options that it has, it's a great development helper tool. So hopefully you will put it to good use. Okay, at this point the environment is all set up, and you're ready to move on.
So the layout is not really what we're after. So once we're done with that you'll see here that your project has been. Created at HTP and you'll see your user name, if you have a user name. And the URL is github.io/coursera-test. That's where your page is located. So if I go right now and copy this link right here. And we'll go to a new tab. You're really going to see the entire website that we just saw right here. Right? And that's all pre-filled for you already. Now this link will not always stay here, if you refresh the browser it's gone. If you forget where that link is, where do you find it? Well you go back to settings and you scroll down and under GitHub pages, you'll see that link again. You can actually click it, open it up and there it is again.
Now when you created the GitHub pages. Let's go back to our repository, we'll click on this, coursera-test. So now know when you created that link, what you actually did is you created a separate branch. Now I'm not going to go into again a whole big explanation about branches, but the bottom line is the way git works is it can have several branches, like several parallel streams almost of the same repository, of the same kind of database of your code. So, the way you see what branches you have is, by right here branch and right now it says it's master. If you click on it you'll see that there's another branch here that actually wasn't there before. If we opened it up before we would've seen only master. But now there's another one called gh pages. If you click on that gh pages, you'll see all this stuff here you really didn't put in here before. Well this stuff is that website that was created for you. So that index.html is that big page with the giant green banner that you've seen. So now, if you're an advanced GitHub user, feel free to use whatever branch you want and then go ahead and merge your stuff into the gh pages branch. Just know, what is in gh-pages branch, that is the only thing that is going to show up on that special link that you created. Nothing in the master, nothing in the other branches will actually show up. So for the beginners what I would suggest doing is, that you should always use just gh pages, and commit everything there. But just remember that the base directory is that website that got created. So if I were you, I would probably create a subfolder and put everything into that subfolder and leave this front page alone. Or if you want you could wipe the whole thing out and create your own page here right here in the root folder. But for now, it's time to go ahead and take this repository and bring it down to our local machine. Well the way we could do that is we have this right here, this URL. This URL actually points to our repository. You could see it has coursera-test.git, and we could copy this URL by just simply clicking this link. We go ahead and open the terminal. So now, what we'll do is we'll say git clone. Clone is the command to actually take the repository that is somewhere remotely, and just provide the URL to that repository and you can see we're done. If you do a less now you'll see that I have coursera-test that is our repository right there. Let's go ahead and cd into it and you'll see that the only thing there it's a README. Okay so really what's going on, if you do git status you'll see that we're on branch master and nothing really is, right now, changed. The thing is though, we won't really want to on branch master. Again, unless you are a more advanced user really want to be on the branch gh pages. And the way you could do that is to say git checkout gh-pages, and when we do that now we say git status, we're going to be on gh-pages. And if you do ls you'll see all that index.html.params@json, then stylesheets folder. It's all there from if you switch back to the browser it's all right here in that branch.
So now we have a couple of choices. If we want, we could just go ahead and wipe out this whole thing, and we'll basically wipe out that auto generated website. Or we could leave it alone, and just basically make a directory. Make a directory, and then we'll call it, let's say site. And CD into that site directory, and there's nothing there. Great. So now we could go ahead and open up Sublime Text and we'll save this page right here. We'll go ahead and save this page to coursera > coursera test > site. We'll save it and call it index.html. And we could quickly do html and do ctrl + space for a quick little template. We'll say hello. Coursera.
And we'll have h1 here. Also say, hello coursera.
Okay, so we have a very quick page. We saved it. Let's go back to our terminal, window ols, and we see this in the HTML. So now to check what's going on in our local git, we'll say git status again. And we'll see that actually ./ and that's because we're inside the site directory. We say that ./ is not actually committed at all. Well we could go one directory up, and then we'll do git status and that will tell you that the site directory is not even. and committed and it's not even marked to be committed so the way it works in order to be committed into the kind that your code data base which actually resides locally in your machine. It is not the remote one. Not the git hub, but the local in your machine is you first have to mark something for committing. The way you mark something for committing. Is you say git add, and then you say what it is that you want to commit, or that is you want to mark for committing. And this one, I'll say dot, and we'll just include everything in my local folder, and that's done. Also, git status again. And you'll see now, what's marked to be committed is that new file, site/index.html. And once again, we haven't committed anything yet, we just marked to be committed. Well, in order to actually commit it, we'll say git commit, we'll say -m, which is required for message, and we'll give it a message. The message will say, My First Page, and we'll press enter, and we're done. And the only thing we need to do now is actually put this into our remote, meaning into our GitHub the remote depository. Right now, everything is sitting in the local depository. If we say git status again, you'll see that everything is great except it'll tell you that your branch, meaning this origin that gh-pages, don't worry about this origin thing, just ignore it for now. But gh-pages is ahead by one commit, meaning our local version of our repository with all of our code is actually ahead of the one that is remote, which is our GitHub repository. So the way we actually do it, it actually tells you right here. Is just issue a git push meaning we'll take our repository take our database of our code, and we'll push it to the remote database which is residing at GitHub.com. So we'll go ahead and say git push and at this point after we enter your machine might ask you for username and password for GitHub my machine has it already entered automatically and you could look up on the web how to do that so it doesn't ask you again. But we'll say Git push and it should give you something like this or tell you something about the fact that I wrote into this repository and you'll see gh-pages, our local gh-pages and our, a local machine has been transferred to the remote one, gh-pages. Okay, so now, if we switched our browser, and we'll refresh this page, you'll see that this site folder showed up here, if we click inside of it, you'll see index.html. Well, let's see if it actually works. We'll go to Settings again, because I don't remember this URL anymore. And we'll click on this URL, open up in a separate tab, and what we see here is that page made by GitHub for you. But remember that right underneath that folder is that folder called site, and if we say site slash here's our page, Hello Coursera. That's the page that we made. And the reason I don't actually have to specify index.html page itself is because most servers when you say slash they will default to index.html. So I don't have to explicitly say it. And clearly GitHub server is one of those servers. And the truth is most services out there actually do this. And if we create anymore sub folders here we could certainly specify them, and if you wanted to, for example, do assignments for different modules, and you could say module one assignment slash something and so on. And this is the way for you to be able to submit your assignments to us to be graded. And then you could continue making your changes. So we'll go ahead and open up sublime, we could make another change, hello Coursera! It's a great course.
We'll save it again. We'll go back to our command line. We'll say get status, and you'll see that now we have a modified page. Well, again, we haven't really marked it to be committed yet if we're done editing it. We could go ahead and say git add and we could say it explicitly if we want to. Or we could just say dot, it doesn't matter. And we edit it and say get status again. And you'll see now it is again marked to be committed to the repository, to our local repository. Well, we'll say again git commit -m for message, and we'll say, small addition to our page content. And we'll say enter. And now, we have committed a change that we have just made, committed that change into our local git repository, but our remote repository doesn't know anything about this. If we switch the browser and we refresh, it's still the same. Well, the reason it stays the same is because nothing really has been uploaded to GitHub yet. And if do git status, it will tell us again that our local branch, the gh-pages, is the head of the remote one by 1 commit because we committed something already. And we can have more than one commit here. We can have more than one commit, and then at some point we'll go ahead and upload it. Or publish our changes to our repository. So we'll say git push to publish our changes, and we're done. So if we switch to the browser and refresh, it might take a little bit, but eventually, this will happen. So something probably got cache. Here we go. It just takes a little bit for it to propagate from its repository to its website, so it took a few seconds, but it's here. Okay, so there's clearly many, many other commands that you could use. For example you could use gitpool if somebody else changed your repository, let's say you're collaborating with somebody. And somebody updated something in the remote repository in the GitHub, and you want to get those changes to your local machine you'll say git pull and so on. And again, I encourage you to go through the first couple of, two, three chapters of the book, and it's definitely very helpful for you to understand. What's really going on with git. However, the commands I gave you should be good enough to be able to publish your code to git hub. And at the same time publish it to git hub pages so they could be visible to the whole world and to the rest of your peers to be able to be graded. So, the next thing I would like to show you is how to use browser sync. Let's go ahead and clear our page, and we are still here inside the GitHub repository, or our local folder. We'll go ahead and go inside site, and here's our index.html. So, browser sync is a command you could call from the command line and here I am just pulled it out from my history. And basically you say browser-sync and you say start. And you want to start the browser sync and you want to start it in server mode so it'll become like a local HTP server for you. And you could say --directory, all that will do is it will actually give you a directory listing of the folder you're sitting in right now, which is, in this case, is the folder called site. And then you say --files, meaning which files should browser sync wish for. And if any of those files change the browser sync will go ahead and then reload those things in the browser so you don't have to keep clicking reload over and over and over again. So in this case we said star I want to reload everything no matter what changes I want those changes reloaded right away. So go ahead and start it. Once I start that, it will go ahead and open up a browser window for me, and in this case you see it is local host port 3000. Since we did -- directory, it's showing me the directory listing of that folder, which is right now the sight folder. And I can see that it's connected to browser sync. And here's this, It's a great course! So now what will be really neat is if I can now pull this aside for a second and open up my sublime text, and just show you what happens when you actually edit this. So now I can go ahead and say, you know what, let me remove this. And I'll remove it and the second I save it, take a look at what happens when I save the file. When I save the file, all of a sudden this gets updated as well. So this is extremely convenient, so that means no matter what is going on here the Cascading Style Sheets, a new content, whatever, it always become immediately available right there in the page. So you don't have to keep coming over here and clicking refresh. That is a huge time saver. When you're developing and trying to see, immediately, what's going on on the page without having to go and clicking refresh. So, that's browser sync, it actually has a million other options and I encourage you to go on their website Google for browser sync. And you'll see all the options that it has, it's a great development helper tool. So hopefully you will put it to good use. Okay, at this point the environment is all set up, and you're ready to move on.
Video Images


0 comments:
Post a Comment